Nothing special, just various bits and pieces from my RC hobby adventures. I enjoy building, flying sport, and tinkering with RC Airplanes. Check out my webpage at www.RCDave.net, email to me at wb4iuy@gmail.com
The rear lighting panel on the trailer was fitted with a bunch of incandescent light assemblies, some of which didn't work. I dropped the panel and found a spiderweb mess of wiring, and decided to rebuild it with LED lamps. Debbie ordered LED light units online, and I got busy. The resulting lighting is very bright and waterproof. While it was apart, I stripped the old dirty adhesive from the panel and beat a few dents out :-) Here's a few pics...
Above, you see the location where the rear lighting panel was installed. I opened it up and found a huge mess of tangled wiring...
All of the old wiring and lighting removed, panel painted, and ready for new lights. I removed a few of the large dents int he panel, as well.
I got a bit more art completed on the hauler. Debbie printed / cut a few more pieces for it, and I got busy getting it installed. I took the liberty of simplifying the designs by reducing colors, etc. Here's a few pics...
Now that the interior is about finished, I'm doing a few things to add color and dress up the outside of the hauler a bit. My wife has a Cricut machine, and uses it for a lot of her crafting. I prepared a few files and had her to print these for the hauler. So far, it's coming along quite nice. There's still other bits to print and apply, but this is a good start. I edited the RDRC club logo (www.RD-RC.com) and played with that a bit. Here's a few pics...
I got a few more finishing touches completed on the interior of the Airplane Hauler, yesterday. After a 40 mile test pull this past Friday ago while running errands, I found a few minor bugs. Nothing major, but stuff that needed to be addressed. I also had an old flag from my late Mom, that I wanted to add to the interior. Here's a few pics and info...
I discovered the locations I chose to hook the little bungees across the wheels, to secure them in the wheel chocks, were incorrect. the airplanes has all shifted around in the trailer. I didn't want that, so I addedsmall cup hooks on either side and that worked much better.
I use a pair of metal cash boxes to store my lipos, nicads, etc. One for charged, one for discharged. Those things were sliding all around and trying to be annoying, so a shelf was installed on the front rack and they were screwed to it.
My Mom always loved her US Flags. This was an old one she had changed out for a new, larger flag at her home, and she gave it to me. I didn't really want it out in the weather, since it is old and beginning to wear, so I installed it in the lid so it would always be with me when I'm out and having RC fun. Added a nice bit of color to the interior, too.
I'm always digging around for a bag of charge cords for the airplanes and transmitters. I screwed a Tupperware bowl to the rear rack and stuffed then all inside. Now, I just pop the lid and they're right there, ready for use.
Another pic of the flag. It was a little breezy when I installed it, and the bottom was gently blowing in the wind. A little bit of Mom will be there with me.
I'm searching about for a local pinstiper who can do old school hand pin striping. I'd like to get some done to the side panels and around the doors before I start applying exterior artwork to this old girl.
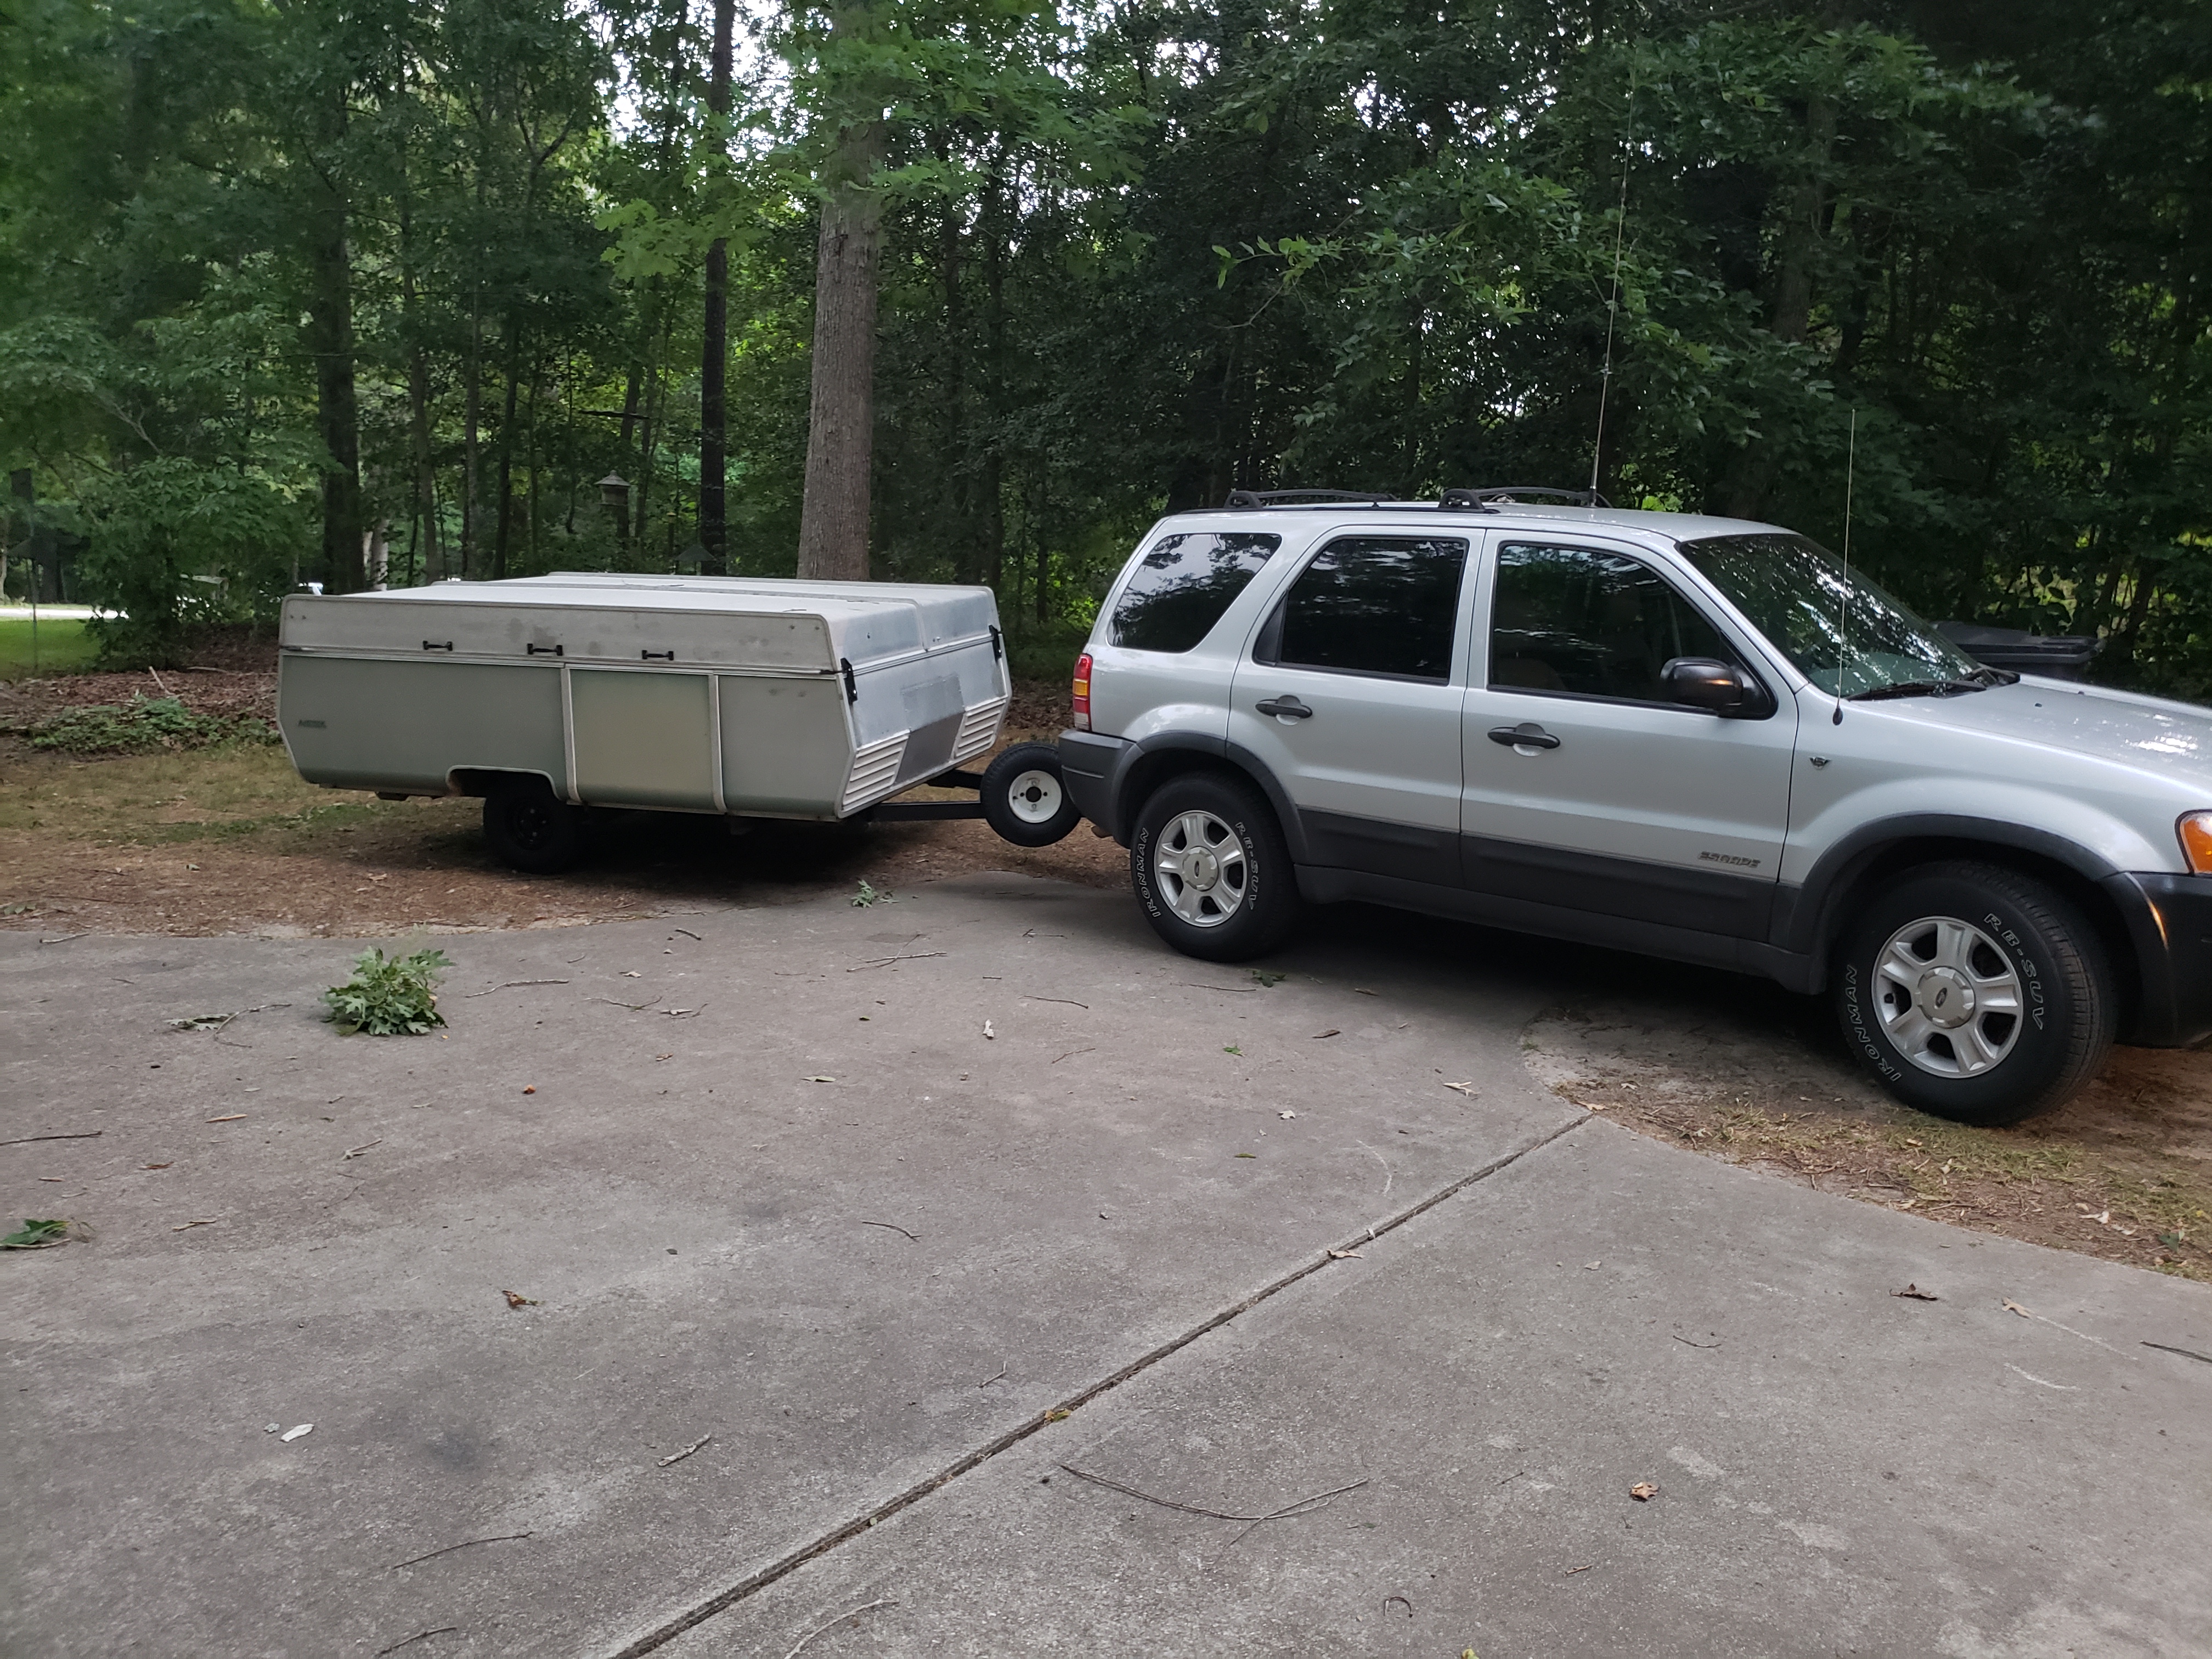
The Airplane Hauler is on the road, 11 days after arriving in my yard as rolling junk. Piles of stuff was removed, rolling gear serviced and updated, leaky things fixed, lid mechanism designed and built, interior layout completed, and other misc things outlined in previous blogs done. My old 2002 Ford Escape with 300,000+ miles is very happy that it pulls effortlessly. I can easily see out of the back window and over the top of the trailer, that was an unexpected plus!
Now, it's on to a little cosmetic stuff, but overall, it's ready to use! I'm working on ideas for some vinyl and such. New LED tail lights and tires will be ordered this coming week, and it's time to go flying!! Here's a few pics of it behind the truck.
I got a few more things done on the hauler, today. It's getting very close to go time, I'm ready to make a pull at highway speeds and test it out. I'm searching for artwork to use when dressing up the exterior, but there's not much out there readily available.
Here's the lid pole retaining system. It's pretty simple, it's basically a way to hold the lid securely so a big wind can't grab it and rip it off. I drilled the mounting blocks and pipes at the bottom, and insert an eye bolt. I thought about securing them to the poles with a piece of cord, but that's just another item to be slinging and banging around when putting the top up and down. Instead, I drilled a couple of holes in the brackets to drop them in when not in use.
All of the latches are reassembled and installed on the trailer with new locks. I was glad these were reusable, I had thought about adding a hasp and lock, but this looks much better. I'm still working on removing the rust stains from the aluminum.
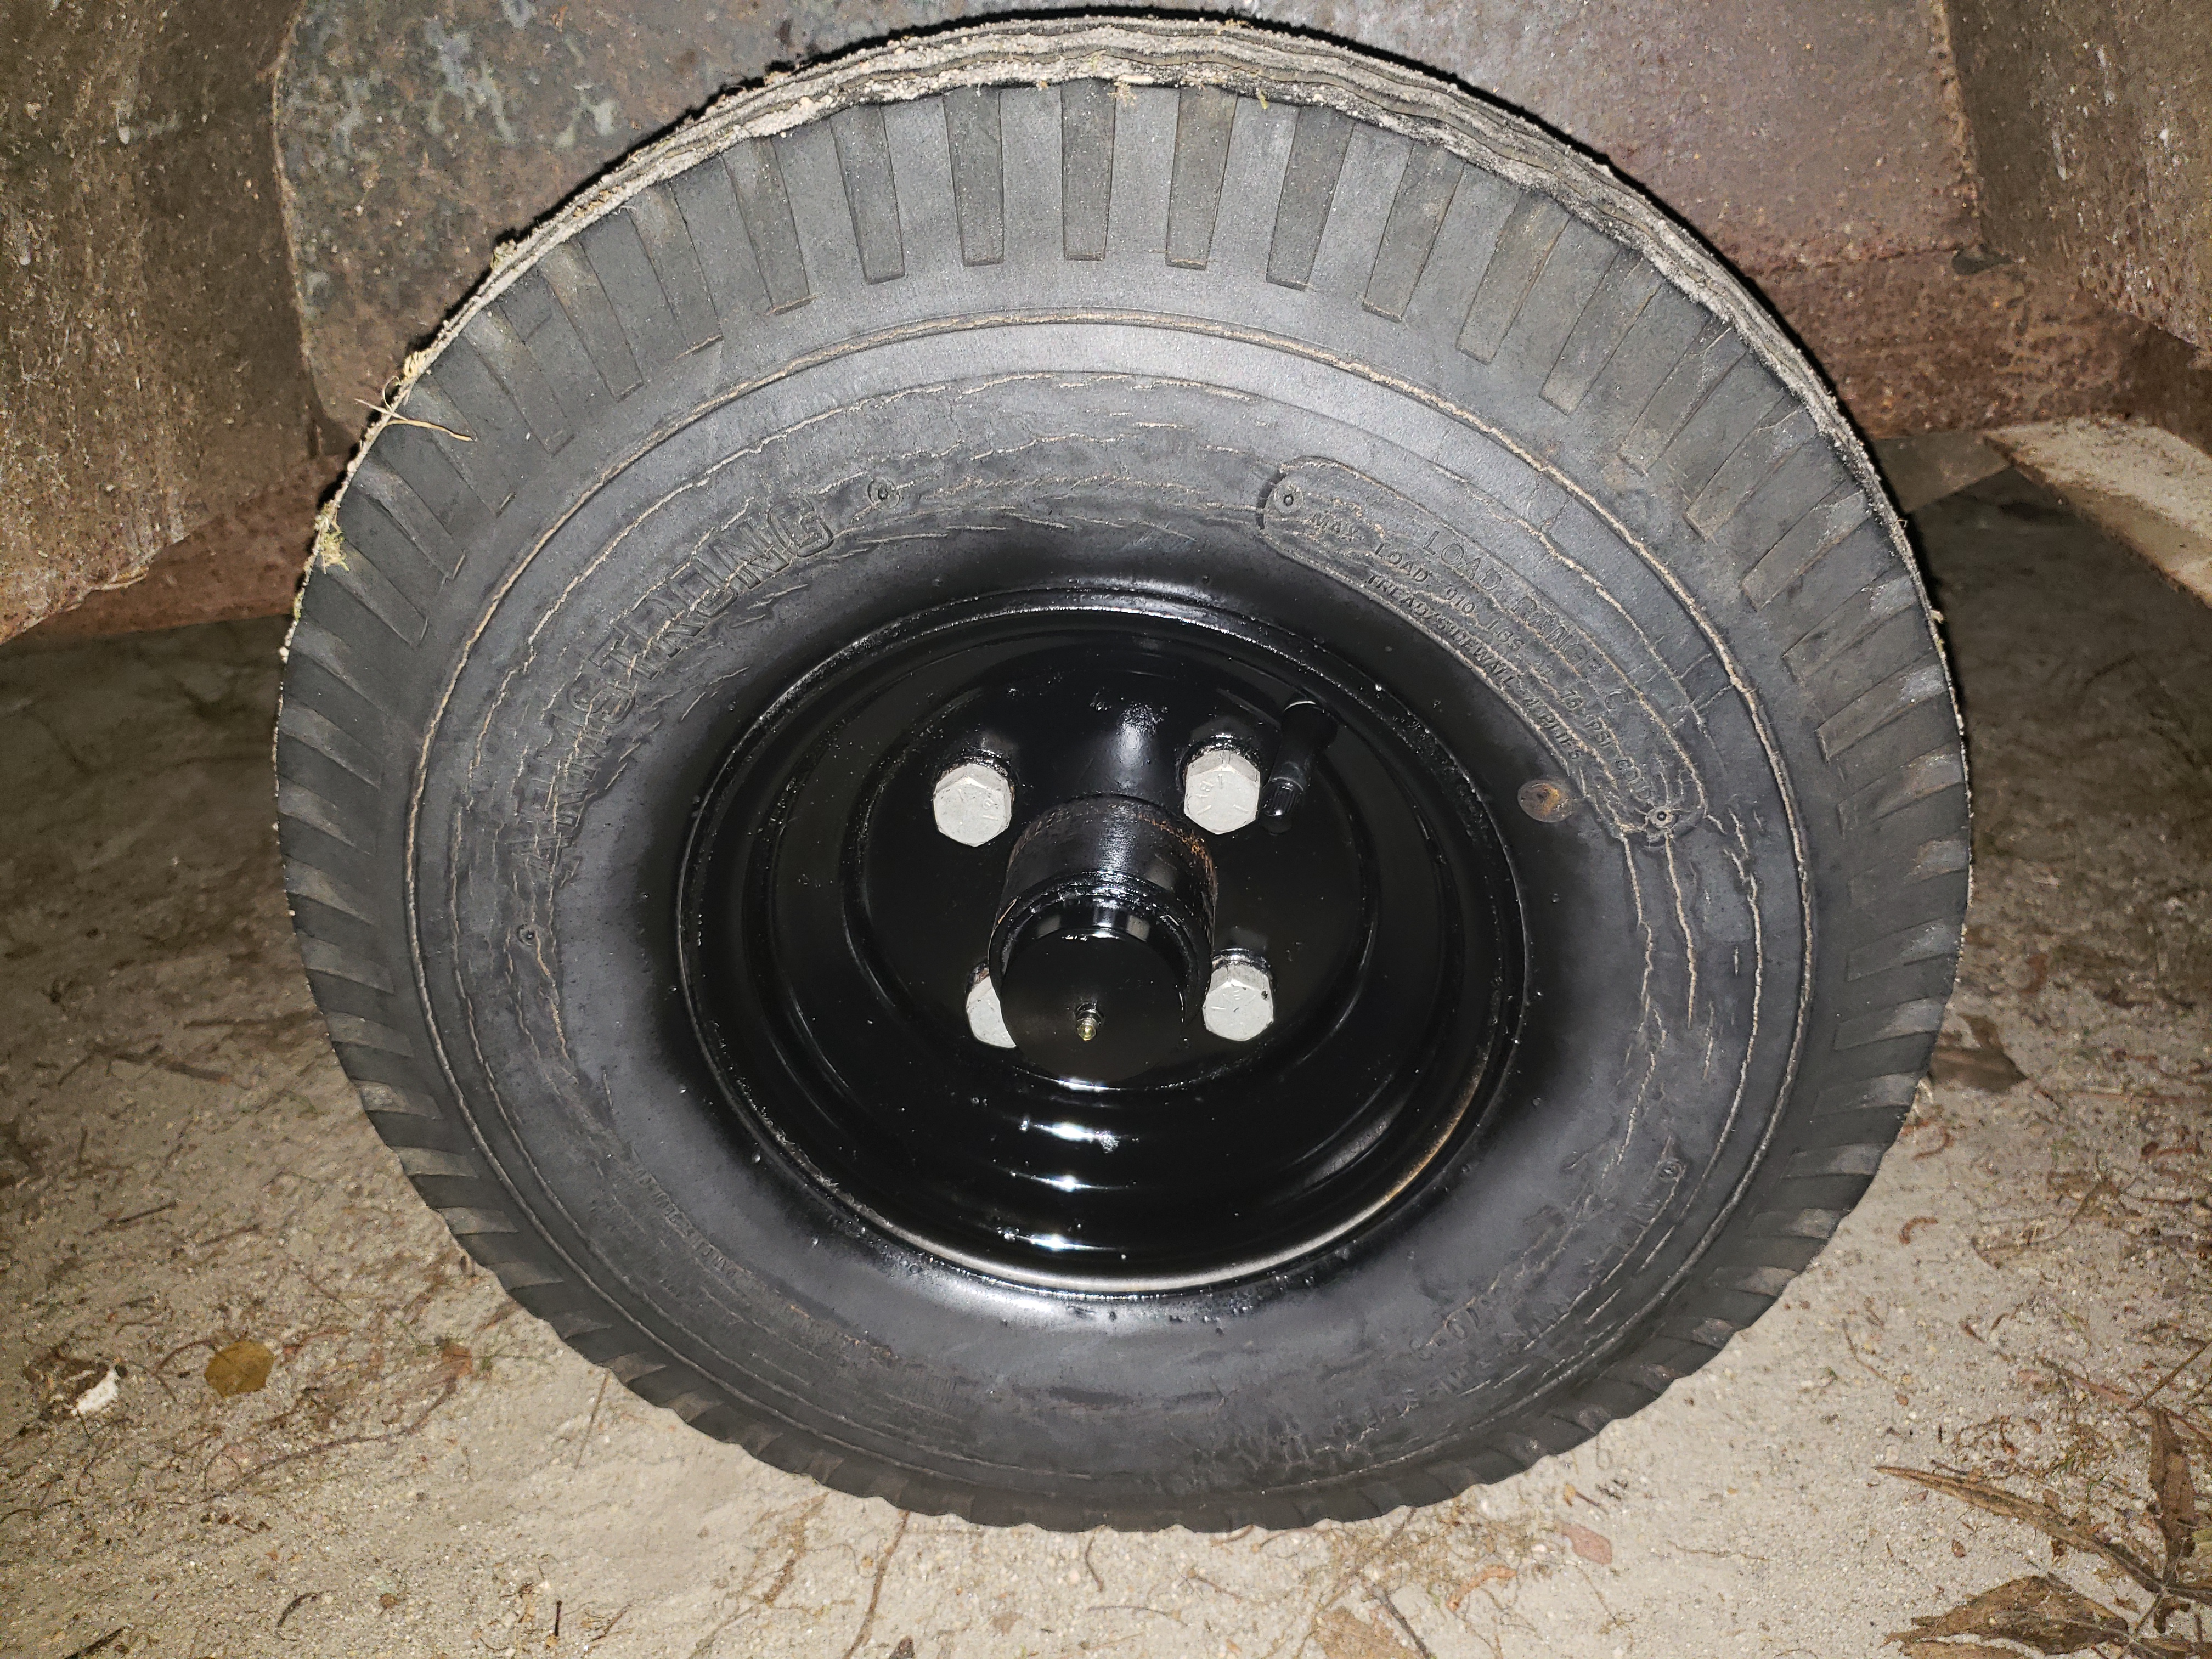
Tires and bearing lubrication... The trailer had been sitting in the woods for 15 years prior to me getting it (since 2007, as of this writing). I wanted to know the condition of the wheel bearings and needed a way to lubricate them. I pulled the caps off of the hubs, and found them nicely packed with blue grease. Since a set of bearing buddies were about $50 and I'm trying to keep this project cheap, I bought a pair of grease fittings for about $0.50 each and drilled / installed them in the bearing caps. I was able to pump the hub full of grease with no issues. The tires are beginning to get dry rot cracks, so I'm searching around for a couple of 5.70-8 replacement tires to install before I go on any long pulls.
A spare tire bracket was fitted onto the front of the trailer tongue. I've seen some brackets that put the tire on the back of the trailer, but this was CHEAP and easy to bolt on. Since the trailer came with a couple of extra tires in it, I was able to pick a tire in fair condition to use as a backup and install that on the bracket.
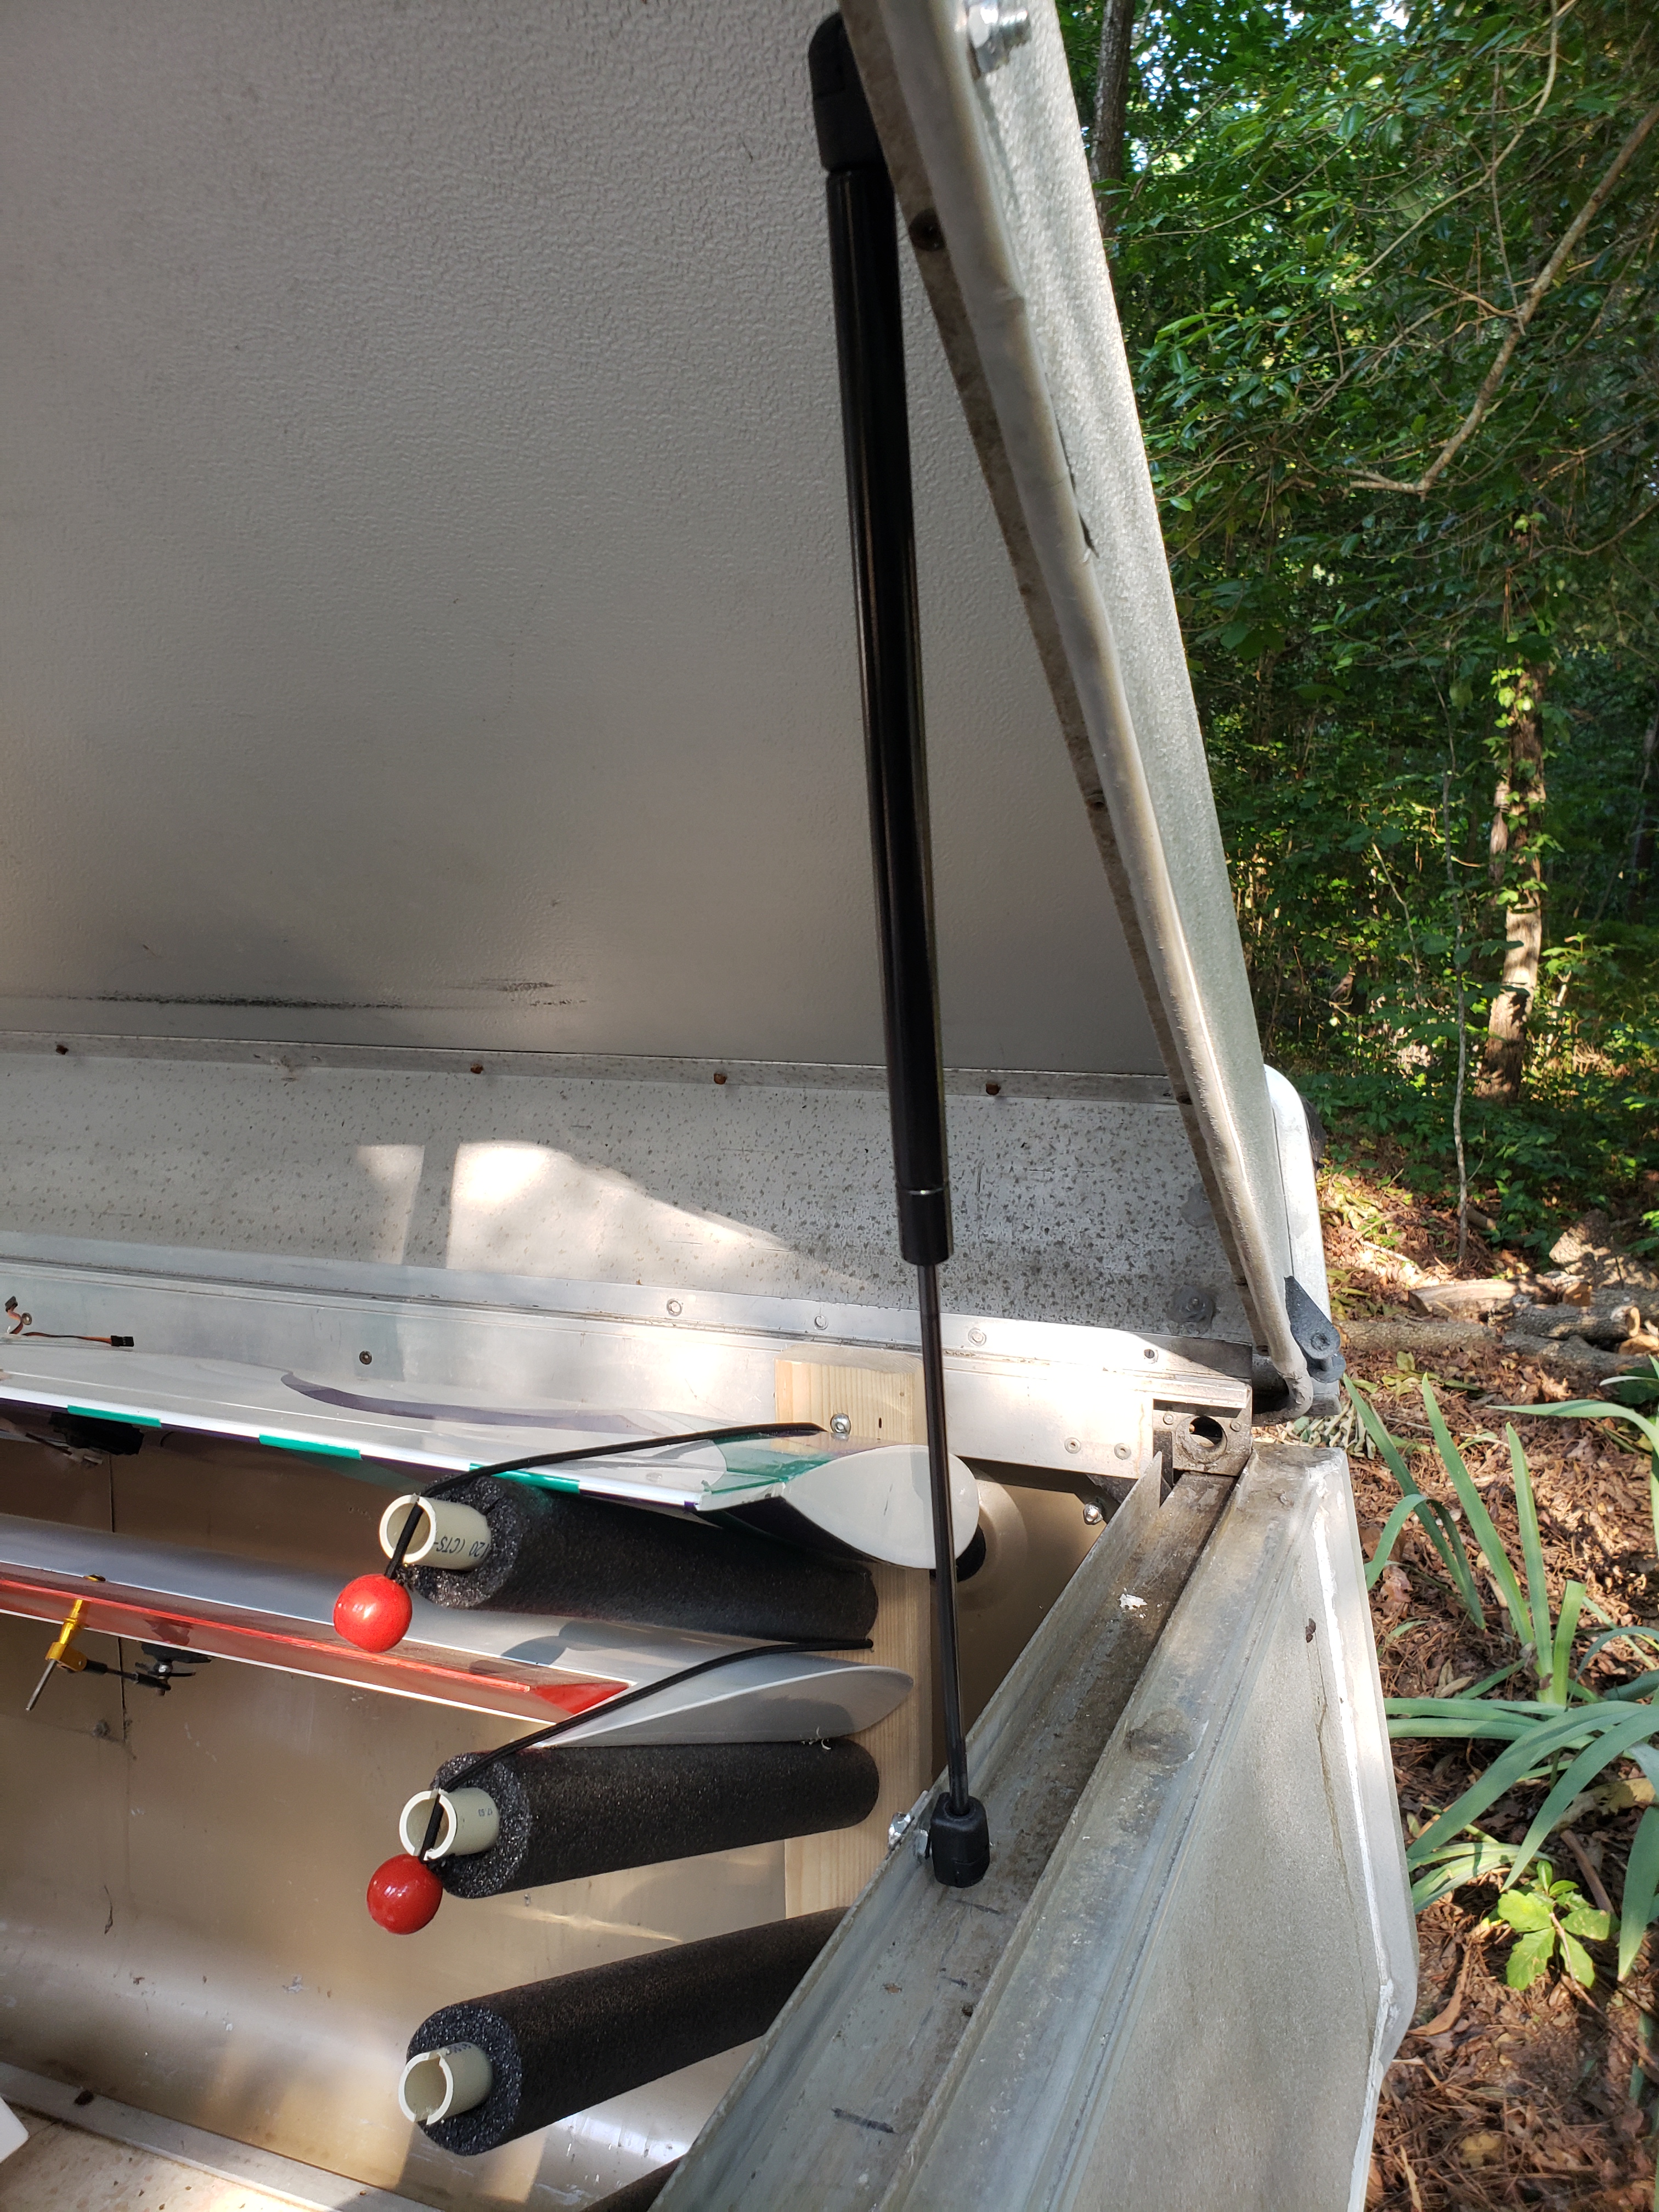
The design of the lid mechanism took a bit of experimentation...but that's how projects sometimes go :-) Once the camper was gutted, I installed a set of heavy barn door hinges on the back side, and lift handles on the access side of the trailer. The lid weighs about 74 lbs, and I measured about 37 lbs at the lift handles required to move it. That doesn't sound like much, but to grab 37lbs at mid-chest high and push it up to about 7 ft, while trying to put lid support poles in place at the far corners was more than I anticipated. A project within a project begins...
LID SUPPORT POLES - I fabricated lid support poles and floor mounted retaining pockets, and hinged them in the corners of the lid. Once the lid was lifted, they would "kinda" fall in place and could be secured with a pin. When it was time to lower the lid, things got fun. I would go to the corners and lift the poles, freeing them from their "pockets", and the lid would immediately start down...in a hurry. That wasn't gonna work. I realized I needed to install a set of gas struts to help manage that.
GAS STRUTS - The gas struts was another interesting part of this. Forces required to open and/or assist the lid movement are amplified greatly as you measure closer and closer to the hinge line. Long struts aren't cheap, and the stronger they are, the more the strut compression force is converted to side / hinge loads when the lid is in a lowered condition. This little all aluminum frame wasn't designed for that, and took a bit of experimentation. I finally settled on a pair of struts that would help lift the lid, slow the descent of the lid, and not have such tremendous side loads when not deployed. I also had to design a vertical member to transfer the lid load to the floor and not bend that little aluminum rail the strut was connected to. OK, that problem was solved...
LID POLE RETRACTION - Lifting the lid was now a cinch, getting it back down and closed was the next problem. The lid poles, even when freed from their retaining pockets, was a fight to get them out of the way. I'd have to go from side to side, moving each one closer to the hinge line, lowering the lid....bit by bit. Not gonna work.
1- I tried several low hanging bungee cables to pull the bottom of the poles to the opposite wall once free, but they would never pull far enough (due to elasticity), or the poles would get snagged on fasteners on the floor along the way, etc. I shaved the bottom of the poles at an angle to help with sliding. That helped, but wasn't the fix.
2- Plan B...I rigged a cord system that started at the lift handles, traveled around the perimeter of the lid, down into the lower section at the hinge line, and back to the lift poles. I would lift the lid a little to free the poles from their retaining pockets, then pull the cords to retract the poles. Those poles are long, and by the time I found the best attachment point to get the ratio so the stroke of my arm would retract them, they were heavy. This system would work, but was going to require a number of pulleys to minimize friction in all of the corners. I may experiment with this more later, but for now, I wanted something simple.
3- Plan C, back to bungees. After pondering it a bit, I realized I needed to pull from a different angle and location, something that would require a minimum of motion, and a short bungee. Also, something that would keep cables and things out of the way for easier end loading of the trailer. Using vice grips attached to a rail inside of the lid, and a number of ties straps on the poles for attachment point, I was able to optimize the location of these two points. A fastener was installed in the lid as a "hook point", bungees were attached to the lift poles, and it worked relatively well.
PARTIAL LID OPENING - After playing with it a bit, I found it helped to have the door open & step deployed. It was also needed to attach and release the bungees (seen in the video). A small intermediate support was fabricated to facilitate this.
WIND CONTROL - We've all been at the flying site when rogue winds would roll through and have canopies flying, trailer doors swinging, and airplanes making unintended flights across the pits. I had this fear of wind grabbing the top and ripping it off of the trailer, so I rigged a simple pinning mechanism to hold the lid poles into their floor mounted retaining pockets. Between that and the gas struts, I _hope_ this will be adequate :-)
CLEARANCE - Once all this was worked out, more or less, I had to clear a path for the poles to swing back and forth during deployment and retraction. This wasn't too hard, but just took a little planning on the interior layout. The video below shows how this redneck lid management system works :-)
The Airplane Hauler is nearing functional completion, and it's about time to start on the exterior cosmetic makeover. This is a quick walk around of the Hauler...
Wow, another long day on the Airplane Hauler project. I worked on this from 6am until after 9pm tonight. The temps were HOT!! I'm finished and didn't want to stop :-)
First, I started moving things around and was not happy with the layout from yesterday. I decided to frame the area up front and move the flight box, radios, etc to the front of the trailer to add some tongue weight and make better use of the space.
I need some bungee nets to attach to the ceiling and make better use of that space. I think there's good space there to hang park flyers and such...
Rearranging the flight gear made a lot of difference in available space! I had to frame up a wall in the front for the flight box and radio gear to reside, while leaving room for the lid support pole to move.
The new, lower pressure gas struts came in. They were a different length than the originals I was previously using, so more experimentation kicked in :-) . They're now mounted and working nicely. I wanted them to only assist with lifting, not do all the lifting. The hinge line and outer wall of the camper weren't designed for a bunch of side force, and I didn't want to redesign the whole body to handle the side forces of the much stronger struts. A pair of supports were fabricated from 3/4" aluminum angle stock, mounted between the lower strut ball to the floor, to help distribute the vertical load when the lid was up. You'll see that in a photo about 3 pictures down...
This is the new placement of things along the front wall of the trailer. I'm sure the location will change a bit over time as aircraft change, but this works pretty good and is a starting point at the moment. The frame along the front secures the flight box and radio boxes and provides support in the forward direction in the event of hard braking while in transport. It also maintains the small amount of clearance needed between the flight boxes and the front of the cabin for the lid support pole to travel during opening / closing of the lid.
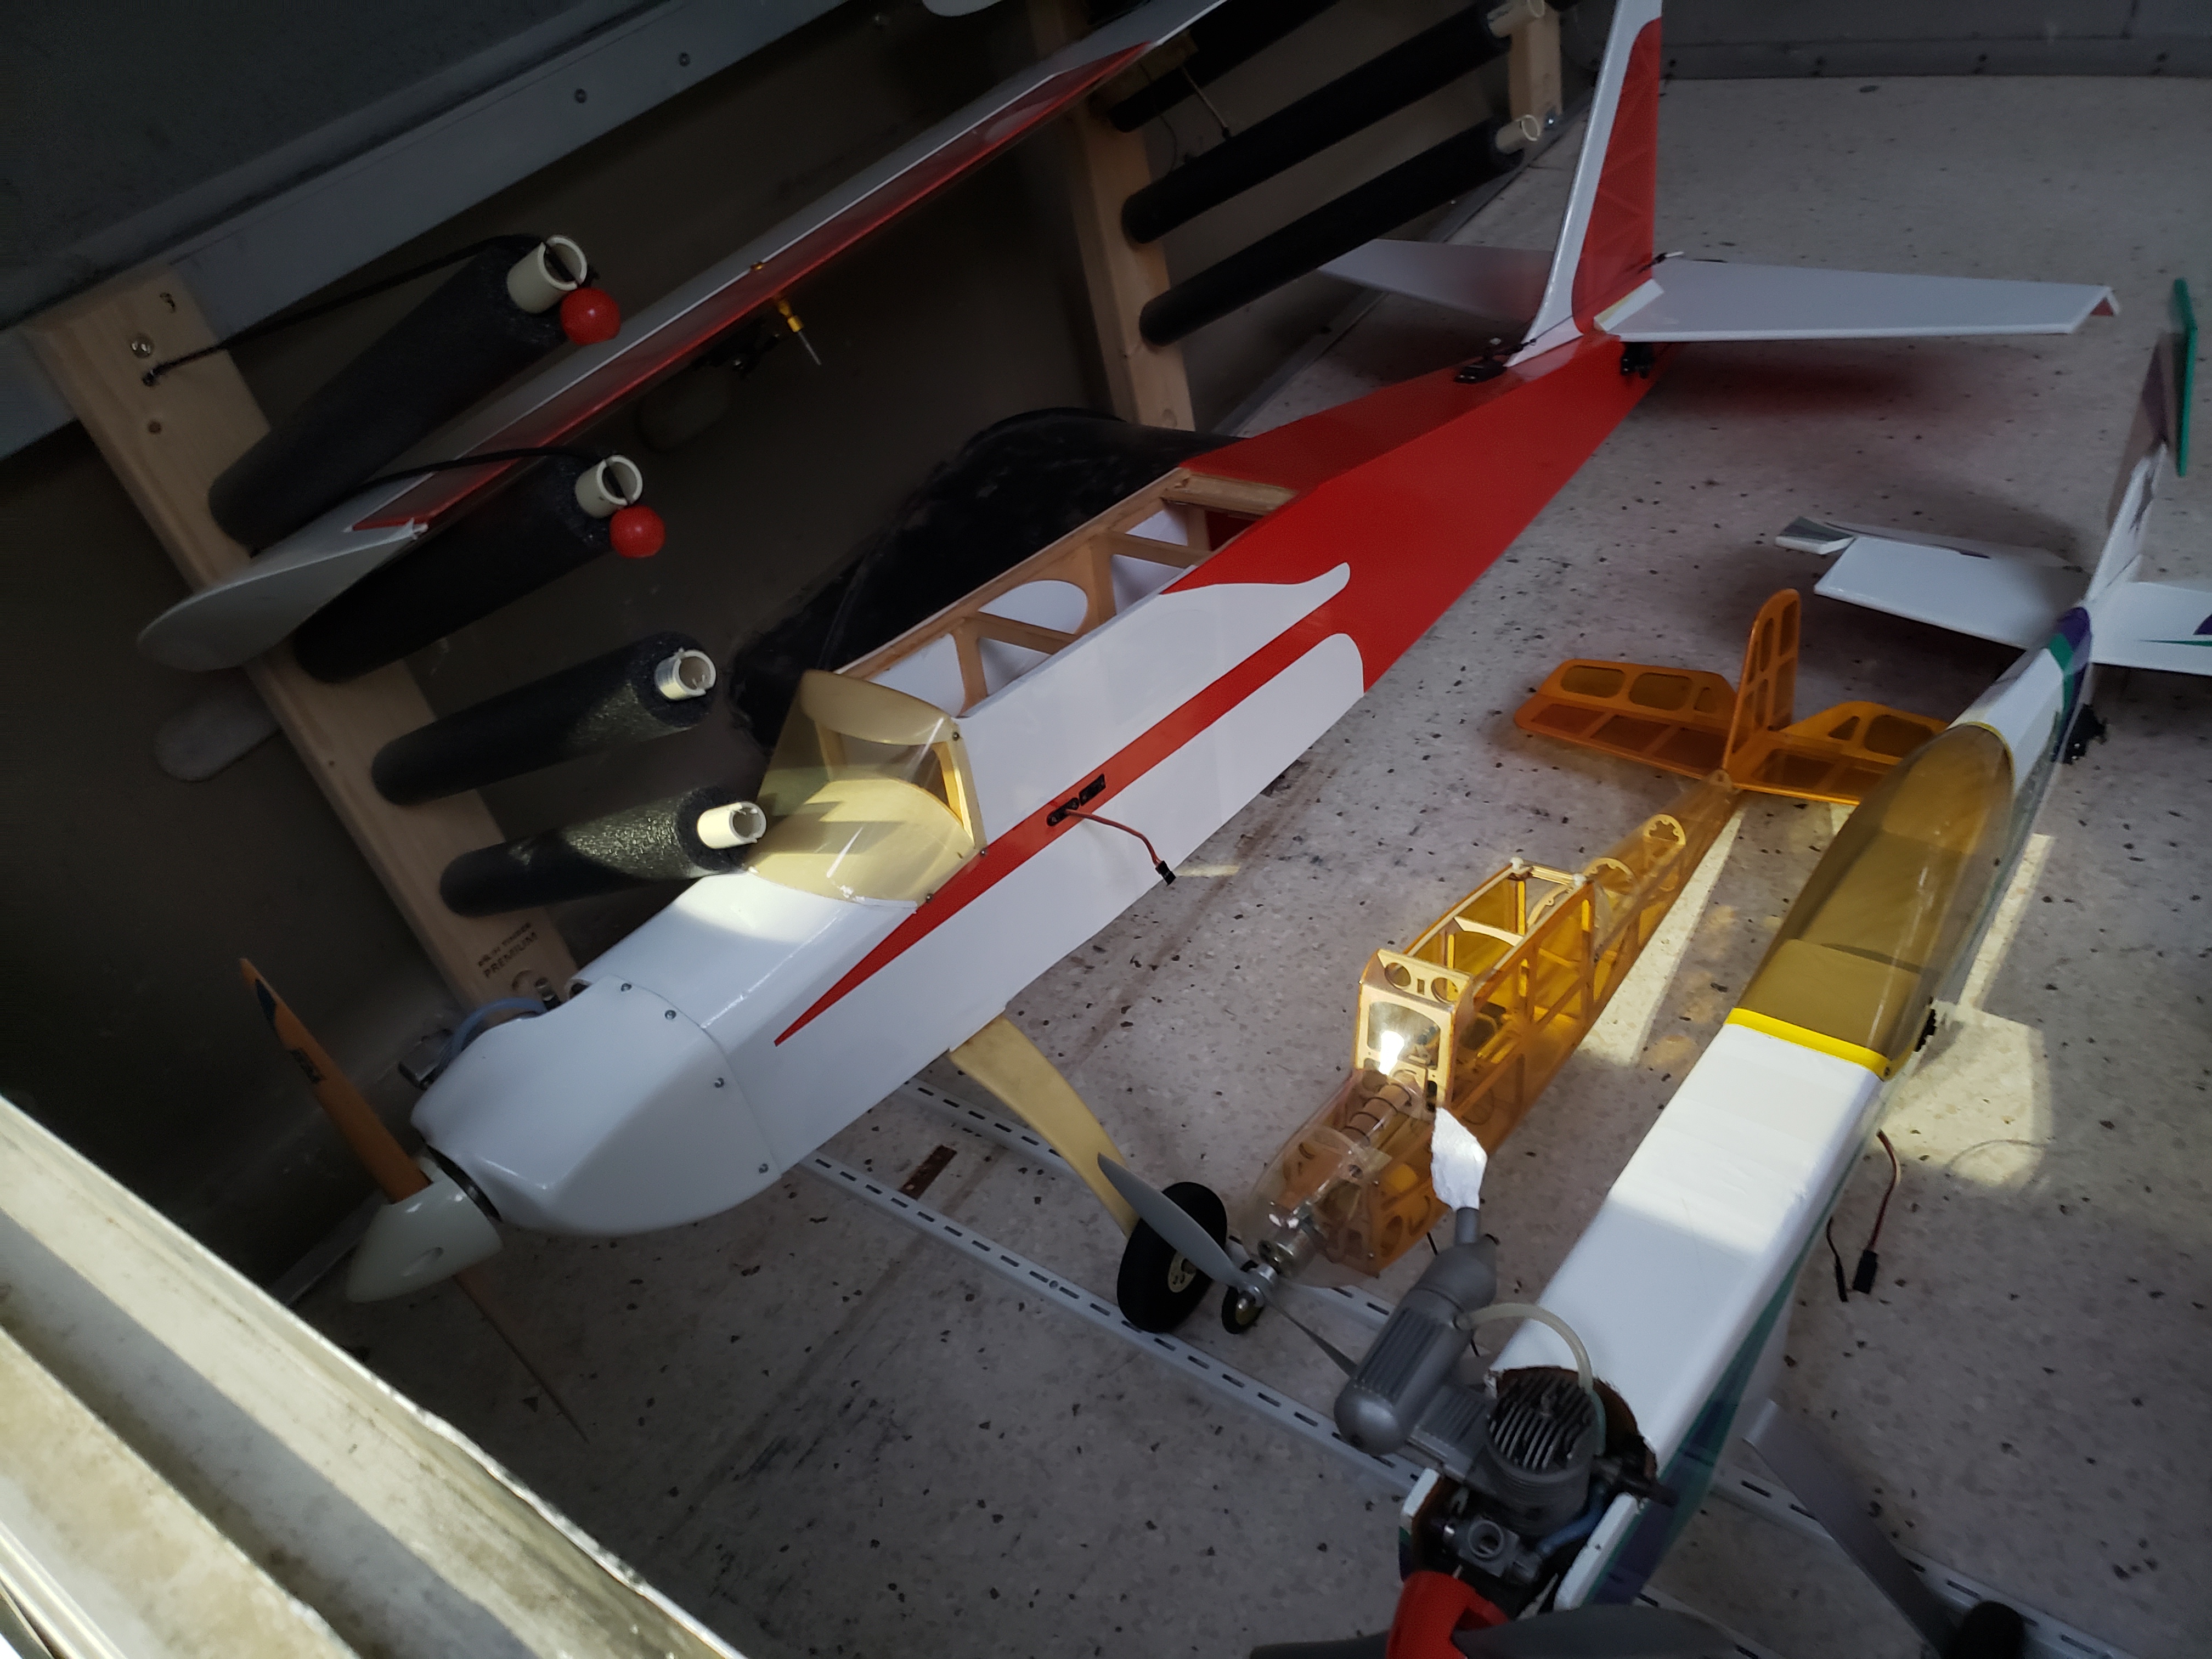
This is the current layout at the rear of the trailer. The wheel chocks and supporting wall near the tent keep things in position and allow for the same lid support pole clearance needed in the front of the trailer. Notice the vertical support fabricated from aluminum angle stock, from the lower lift strut to the floor (near the nose of the red airplane in this pic).
You can see a temporary electrical cable passing along the far wall of the trailer, behind the wing rack supports. Power plugs into the rear of the trailer from an outside source, and is then distributed to the tent and front wooden wall structures.
I'm beginning to get chargers, surge protectors, and such placed about the trailer and secured with bungees for easy relocation. I'm sure things will move a bit, yet. Once this has been in use a while, and I'm satisfied with the location of everything, I'll remove everything from the interior and recover the floor with checkerboard tile. I didn't want to put the tile down first, then drill holes all over as I was working out the layout :-)
I'm still trying to figure out how to use this space... Maybe large bungee nets? I could build a drop down frame of some sort, but I want to keep the weight at a minimum, and maybe just use this as a space to store my park flyers in their boxes for transport.
The Airplane Hauler project is moving right along, and nearing completion! It'll be a big help to me, so I don't have to constantly move things in and out of my little Ford Escape, and make it much easier to quickly get out to the field and fly a little. Outside temps have been rough, here...in the mid & upper 90's with super high humidity. I'll get up and start on it at sunrise, and work until about noon. By that time, I've had all I want and I'll go in for a nice cool shower :-) OK, here's where the project is, now...
I noticed, while working with those nitrogen filled lift cylinders, they would try to push the lid in one direction or another when the lid was down. All of the cylinder energy was converted to side force on the hinges when horizontal. So, I added additional fasteners to help hold that. Also, I made a huge mistake on the strength required to lift this 74 lbs aluminum lid (about 37 lbs required at the lift handles to open) . I originally bought a pair of 100lb force cylinders, and they were WAY too much for the job. I literally had to swing my body weight on the lid to close it. I only want to have them help me lift it, I don't want them to hold the lid up. I fabricated a pair of lid safety poles for that purpose. After seeing rogue winds throw canopies over cars, slam trailer doors, and such at fly-ins for years, I prefer to hold the lid a bit more securely. I'll use lid the support poles to keep it from closing, and the bottom of them will be pinned to keep wind from grabbing the lid and yanking it up and over. Additionally, the lift support cylinders will help keep it from over-opening as well. The cylinders came late today, so maybe I'll get them on, tomorrow.
Here's a few pics of the lid support poles and the floor pockets I made for them. I have to go back and drill the pockets for the insertion of a security pin. The poles are hinged in the lid, and a light duty bungee will be connected near the bottom to a point on the other side of the trailer for retraction when the lid is down.
Rust and scale was removed from the rest of the latch hardware, it was all primed / painted, and installation of it has begun. The old hardware was very rusty, and has stained the aluminum below it. I've tried rubbing compound, hand glaze, non-acidic AC coil cleaner, and a host of automotive cleaners. Nothing seems to touch it. I'd love to hear from anyone who might know a trick to remove these stains at wb4iuy@gmail.com .
The first set of wing racks were built to utilize the full length of the opposite wall (100" or internal space). 12 pieces of 3/4" PVC (7/8" O.D.) was cut to 20" long, and the 25" long 2x4 uprights were drilled with a 7/8" wood bit at 30 degrees. The ends of the PVC were split to allow a simple canopy bungee to slip over the ends and apply a tiny amount of pressure to the wing panels to hold them securely while in transit. The spacing was drilled at 4-1/4" center-to-center, based on the thickness of the wings I use. I'm not sure I like that, it's a little closer than I had hoped for. I think I'll go back at a later time and drill a new set of uprights at maybe 5" CTC spacing. Hey, it's a work in progress, right? :-)
A little area at, and just behind, the inner fenders was framed up to allow for storage of a pop-up tent, chairs, fuel, cleaning supplies, cooler, etc. It has tabs to lock the flight box in place and that will be secured by an elastic strap. Since I couldn't store the canopy up front, I decided to keep the front area clear for other aircraft placement in the floor. Again, as time goes on, I may change my mind on the location of things, but this is where I am at the moment.
The interior is fairly clear and uncluttered, so far. Time to start placing wheel chocks for the airplanes and see how it all works out. I'm still not sold on the flight box location, since it's a heavy item and the trailer tongue weight is very low... A tail heavy trailer is like a tail heavy airplane, they don't handle so well...
Finally dropping in a few wings and airplanes to get the location of the wheel chocks worked out. Nope, I'm still not sold on the flight box location. I may frame up a space in the nose of the trailer and play with it up there, and leave more space open in the rear for airplanes side-by-side...